
- 無料でSSL接続をしたい
- NginxでLet’s Encryptを使いたい
前にCentOSにNginxをインストールする方法を書きましたが、今回はそのNginxのWebサーバーにSSL接続を可能にする方法です。
仕様するのは無料のSSL証明書Let’s Encryptです。
Let’s Encryptの設定方法を順を追って説明していきますので、Let’s EncryptでSSL対応をしたい人の参考になれば嬉しいです。
- Let’s Encryptのインストールの仕方
- SSL証明書の取得の方法
- NginxでのSSL接続の設定
Let’s Encryptインストール
前提条件
いろいろありますが、以下の条件をクリアしているのを前提として書きます。
- 証明書を取得するドメインでサーバーアクセスが可能(DNSで名称解決が可能)
- Nginxがインストール・起動済み
- 80番ポートでサクセスが可能
- gitがインストールされていてgitコマンドが使える
Nginxのインストール方法についてはこちらの記事を参照ください。
certbotのインストール
まずはLet’s Encryptのクライアントツールのcertbotをインストールします。
インストール方法は任意の場所にgit cloneするだけです。
$ cd /usr/local
$ git clone https://github.com/certbot/certbot
SSL証明書の取得
certbotを使った証明書の取得方法にはstandalone方式とwebroot方式があるんですが、今回はwebroot方式で行います。
webrootではNginxが起動していた、80番ポートでアクセスできる必要があります。
以下のコマンドを打つとメールアドレスの入力やらライセンスAgreeやら取得ドメインやら聞いてくるので逐一入力しましょう。
$ ./certbot/certbot-auto certonly --webroot -w /usr/share/nginx/html/ -d hirooooo-lab.com- ここでは取得ドメインは[hirooooo-lab.com]としておきます。
- /usr/share/nginx/htmlはNginxのデフォルトのwebRootになります。
- ./certbot/certbot-autoはcloneしたディレクトリのcertbot-autoが実行ファイルです
最終的なやり取りはこんな感じになりました。
./certbot/certbot-auto certonly certonly --webroot -w /usr/share/nginx/html/ -d hirooooo-lab.com
~~~
ここはズラーっとパッケージをダウンロードしてきてた
~~~
Complete!
Creating virtual environment...
Installing Python packages...
Installation succeeded.
Saving debug log to /var/log/letsencrypt/letsencrypt.log
Plugins selected: Authenticator webroot, Installer None
Enter email address (used for urgent renewal and security notices) (Enter 'c' to
cancel):                                                                                                     ←ここでメアド入力

- - - - - - - - - - - - - - - - - - - - - - - - - - - - - - - - - - - - - - - -
Please read the Terms of Service at
https://letsencrypt.org/documents/LE-SA-v1.2-November-15-2017.pdf. You must
agree in order to register with the ACME server at
https://acme-v02.api.letsencrypt.org/directory
- - - - - - - - - - - - - - - - - - - - - - - - - - - - - - - - - - - - - - - -
(A)gree/(C)ancel: A                                                                                                                ←ここで規約確認

- - - - - - - - - - - - - - - - - - - - - - - - - - - - - - - - - - - - - - - -
Would you be willing to share your email address with the Electronic Frontier
Foundation, a founding partner of the Let's Encrypt project and the non-profit
organization that develops Certbot? We'd like to send you email about our work
encrypting the web, EFF news, campaigns, and ways to support digital freedom.
- - - - - - - - - - - - - - - - - - - - - - - - - - - - - - - - - - - - - - - -
(Y)es/(N)o: N                                                                                                                        ←あんたのメールにいろいろ送っていいってことだと思う
Obtaining a new certificate
Performing the following challenges:
http-01 challenge for api.research-ranger.com
Using the webroot path /usr/share/nginx/html for all unmatched domains.
Waiting for verification...
Cleaning up challenges

IMPORTANT NOTES:
 - Congratulations! Your certificate and chain have been saved at:
   /etc/letsencrypt/live/hirooooo-lab.com/fullchain.pem
   Your key file has been saved at:
   /etc/letsencrypt/live/hirooooo-lab.com/privkey.pem
   Your cert will expire on 2020-06-15. To obtain a new or tweaked
   version of this certificate in the future, simply run certbot-auto
   again. To non-interactively renew *all* of your certificates, run
   "certbot-auto renew"
 - Your account credentials have been saved in your Certbot
   configuration directory at /etc/letsencrypt. You should make a
   secure backup of this folder now. This configuration directory will
   also contain certificates and private keys obtained by Certbot so
   making regular backups of this folder is ideal.
 - If you like Certbot, please consider supporting our work by:

   Donating to ISRG / Let's Encrypt:   https://letsencrypt.org/donate
   Donating to EFF:                    https://eff.org/donate-le
上記の例だと
Your cert will expire on 2020-06-15. To obtain a new or tweaked
version of this certificate in the future, simply run certbot-auto
again. To non-interactively renew all of your certificates, run
“certbot-auto renew”
とのことで、2020-06-15で期限切れるからそしたらcertbot-auto renewしてねって言ってますね。
とりあえずこれでSSL証明書の取得は完了です。
NginxのSSL接続設定
取得した証明書をNginxに設定してSSL接続を有効にします。
Nginxの設定ファイルを作成
/etc/nginx/conf.dにserver.confファイルを作成します。
$ vi /etc/nginx/conf.d/server.conf以下の内容をserver.confに入力してください。
# http redirect to https
server {
  listen 80;
  server_name hirooooo-lab.com;
  return 301 https://$host$request_uri;
}

server {
  listen 443 ssl;
  ssl_certificate     /etc/letsencrypt/live/hirooooo-lab.com/fullchain.pem;
  ssl_certificate_key /etc/letsencrypt/live/hirooooo-lab.com/privkey.pem;
  server_name hirooooo-lab.com;
  root /usr/share/nginx/html;
  index index.html;
}これで最低限のSSL接続をする設定はできたので、Nginxをrestartすれば完了です。
Nginxのリスタート
$ sudo systemctl restart nginxリスタートしてもダメな場合はリロードコマンドをやってみましょう。
$ sudo nginx -s reloadもしブラウザでの表示が接続が拒否される場合は、firewallでhttpsポートが塞がれている可能性があります。
その場合はfirewall-cmdでポートを開放しましょう。
ポートの開放の仕方は前回の記事にも書きましたので、今回は省略します。
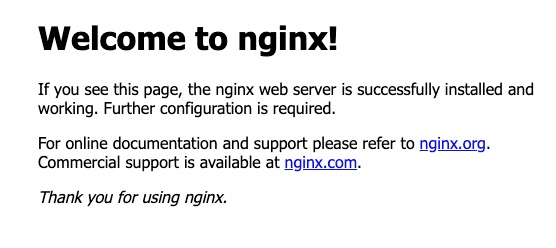
https接続が完了
httpsでブラウザからドメインを表示してみましょう。
無事にnginxのページが表示されたらSSL化完了です。
Let’s EncryptでNginxをSSL接続のまとめ
今回はLet’s Encryptを使用してNginxにSSL接続ができるようにしてみました。
このままでは3ヶ月後にLet’s Encryptの証明書が切れてしまうので、定期的に手動更新するか、更新スクリプトをcronなどで自動化するのをオススメします。
証明書の更新についてはまた別の記事で書きたいと思います。
今は常時SSLが当たり前の世の中なので、Let’s EncryptでSSL対応をする人の参考になれば幸いです。
- Let’s Encryptを使うにはcertbotをインストール
- SSL証明書を発行したらserver.confを設定して完了
- 表示されない場合はfirewallやNginxのreloadを試してみる
- 証明書更新は別の記事で紹介
更新の記事はこちら
サーバー構築にオススメのVPS
気軽にサーバーを構築したい場合に、すぐに使えるConoha VPSがオススメです!
SSDの高速サーバーが初期費用無料で低価格でサーバーを持つことができます。
プランリニューアル&容量増量!【衝撃価格】月額620円のConoHa VPS【512MBプラン】
私も実際にConohaVPSを使ってますが、値段的にも機能的にもオススメできるVPSサービスです。

 オーカミ
オーカミネットワークについての基礎知識がゼロから学べるオススメの教科書です!


コメント