React × Reduxの連載記事の8回目です。
今回はいよいよAPIとのREST通信を実装していきたいと思います。
Javascript用のHTTP通信を行うライブラリはいろいろありますが、今回はaxiosを使って実装していきます。
通信先となるAPIサーバー構築は今回は触れずに、Google Books APIを利用して検索条件に検索ワードを入力し、ヒットする書籍情報を取得して画面に表示するところまで行いたいと思います。
今回はちょっと長いです。
書きたいことを書いちゃうとキリがないので、細かい部分の説明は省略しちゃいますが、順を追って作っていきたいと思います。
- axiosライブラリを使ったHTTP通信の実装
- Redux Toolkitを使ったsliceへのaxios実装の仕方
- 自分で作ったプログラムが動くと嬉しい!
この記事のターゲットとなる環境
現在の環境状況や前提条件を書いておきます。
- Mac OS Catalina ver 10.15.4
- 7日目の記事内容まで理解している
- 環境ターゲット(2020-04-24現在最新)
- React16.13
- Redux7.2
- webpack4.43
- babel7.8.7
- eslint6.8
- Material-UI4.9
- react-router-dom5.1.2
- react-hot-loader4.12
- axios0.19
これまでのReact × Reduxの連載記事はこちらからどうぞ
http://hirooooo-lab.com/react-redux/必要なモジュールをインストールする
冒頭でも書きましたが、今回はaxiosを使ってREST API通信を実装したいと思います。
axiosとはjQueryだとjQuery.ajaxのようなHTTP通信を行うモジュールです。
PromiseベースでHTTP通信を行うことが可能で、現状のフロントエンドのhttpクライアントではスタンダードなモジュールだと思います。
[blogcard url=”https://github.com/axios/axios”]
axiosの詳しい使い方については今回はあまり深く触れませんので、公式githubのドキュメントや、web上の記事がいっぱいありますので、詳しくはそちらをみてもらえればと思います。
axiosをインストール
いつも通りnpmでインストールしましょう。
$ npm install --save axiosGoogleBooksAPIについて
Google Books APIは誰でも簡単に利用することのできる書籍検索APIです。
今回はREST 通信がメインなので、APIの仕様や使い方などは省略させていただきますが、こちらの記事がとても詳しく書いてあるので、一度読んでみるといいと思います。
[blogcard url=”https://miyachi-web.com/google-books-apis/#Google_Books_APIs”]
bookページの作成
検索ワードから書籍検索を行うページを新たに作成したいと思います。
とりあえず今まで通りのcontainerとcomponentを作成しましょう。
BookComponent.jsaxの作成
componentsにもディレクトリを作って、components/book/BookComponent.jsxを作成します。
とりあえずは、検索ワードを入力するテキストフィールド、検索ボタン、検索結果を表示する箇所を作っちゃいましょう。
検索ワードはuseStateでsearchWordというstateに保持させるようにします。
MaterialUIのTextFieldを使って、valueとonChangeにsearchWordとsetSearchWordを設定します。
検索ボタンのonClickにはとりあえずaleatを呼んでるだけのhandleOnClickSearch関数を設定してます。
※あとでここに検索アクションを追加します。
import React, { useState } from 'react';
import { useHistory } from 'react-router';
import { makeStyles } from '@material-ui/core/styles';
import TextField from '@material-ui/core/TextField';
import Button from '@material-ui/core/Button';


const useStyles = makeStyles((theme) => ({
  button: {
    margin: theme.spacing(1),
  },
}));


const BookComponent = () => {
  const classes = useStyles();
  const history = useHistory();

  const [searchWord, setSearchWord] = useState('');

  const handleOnClickSearch = async () => {
    alert('clicked search button!');
  };

  return (
    <div style={{ width: '100%' }}>
      <div style={{ textAlign: 'center' }}>
        <h2>
          書籍情報を検索するやつ
        </h2>
        <div className="centerTable" style={{ width: '100%', maxWidth: 600 }}>
          <div>
            <h3>検索ワードを入力</h3>
            <TextField
              id="search-word"
              label="検索ワード"
              placeholder="検索したい文字・ワードを入れましょう"
              value={searchWord}
              onChange={(e) => setSearchWord(e.target.value)}
              helperText="ex)鬼滅の刃"
              margin="normal"
              fullWidth
              InputLabelProps={{ shrink: true }}
              required
              type="search"
              inputProps={{ title: '検索ワード', maxLength: 20, minLength: 0 }}
            />
            <Button
              className={classes.button}
              variant="contained"
              color="secondary"
              onClick={handleOnClickSearch}
              disabled={searchWord === ''}
            >
              書籍検索
            </Button>
          </div>
          <div>
            <h3>検索された書籍は?</h3>
            TODO ここに検索結果を表示する
          </div>
        </div>
      </div>
      <div style={{ textAlign: 'center' }}>
        <Button
          className={classes.button}
          variant="text"
          onClick={() => history.push('/')}
        >
          トップに戻る
        </Button>
      </div>
    </div>
  );
};

export default BookComponent;
BookContainer.jsxの作成
続いてcontainersにもzipのディレクトリを作成して、containers/book/BookContainer.jsxを作成します。
とりあえずは前述のBookComponentが呼び出されてるだけでOKです。
import React, { useEffect } from 'react';

import Book from '../../components/book/BookComponent';

const BookContainer = () => {
  const zipActions = useActions({ getAddress });

  useEffect(() => {
    console.log('BookContainer:useEffectによる初回処理');
  }, []);
  return (
    <div>
      <Book />
    </div>
  );
};

export default BookContainer;
bookページを出せるように修正
bookページの元ができたので、とりあえずそのページを表示できるようにAppContainerとTopComponentを修正していきます。
AppContainerにルーティング追加
AppContainerのルーティングに/bookを追加しましょう。
BookContainerをimportして以下のRouteを追加します。
import { hot } from 'react-hot-loader/root';
import React, { useEffect } from 'react';
import { BrowserRouter as Router, Route, Switch } from 'react-router-dom';
import { MuiThemeProvider, createMuiTheme } from '@material-ui/core/styles';
import * as Colors from '@material-ui/core/colors';

import Header from '../components/header/HeaderComponent';
import TopContainer from './top/TopContainer';
import LoginContainer from './login/LoginContainer';
import CounterContainer from './counter/CounterContainer';
import SampleContainer from './sample/SampleContainer';
import BookContainer from './book/BookContainer';
import NotFound from './NotFound';

const theme = createMuiTheme({
  palette: {
    primary: Colors.lightBlue,
    secondary: Colors.yellow,
  },
});

const AppContainer = () => {
  useEffect(() => {
    console.log('AppContainer:useEffectによる初回処理');
  }, []);

  return (
    <MuiThemeProvider theme={theme}>
      <div>
        <Header />
        <div id="contents">
          <Router>
            <Switch>
              <Route path="/" exact>
                <TopContainer />
              </Route>
              <Route
                path="/login"
                exact
                component={LoginContainer}
              />
              <Route
                path="/counter"
                exact
                render={() => <CounterContainer />}
              />
              <Route
                path="/sample"
                exact
                render={() => <SampleContainer />}
              />
              <Route path="/book" exact>
                <BookContainer />
              </Route>
              <Route component={NotFound} />
            </Switch>
          </Router>
        </div>
      </div>
    </MuiThemeProvider>
  );
};

export default hot(AppContainer);
※変更箇所はハイライトしてあります。
TopComponentに遷移ボタンを追加
トップページからzipページに遷移できるようにボタンを追加しておきます。
import ....{途中略}....
...
...
const TopComponent = () => {
  const classes = useStyles();
  const history = useHistory();

  return (
    <div style={{ width: '100%' }}>
      <div className="centerTable">
        <h2>
          トップページ
        </h2>
        ...
        {途中略}
        ...
        <div>
          <Button
            className={classes.button}
            variant="contained"
            onClick={() => history.push('/book')}
          >
            書籍検索へ
          </Button>
        </div>
      </div>
    </div>
  );
};

export default TopComponent;
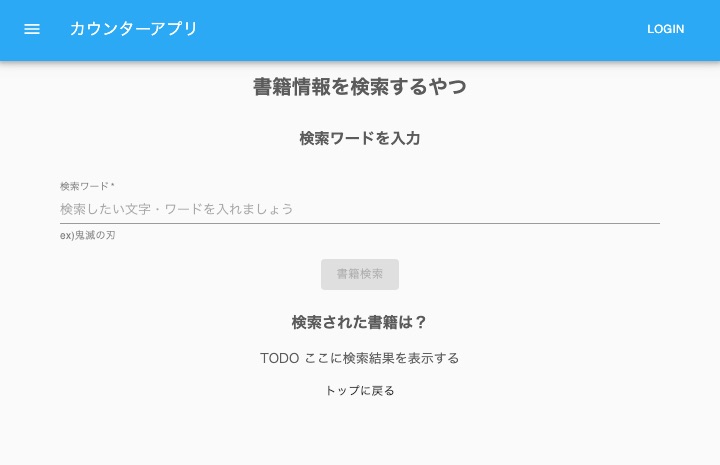
ここまででとりあえずの下準備は完了です。
試しに実行してみましょう。
トップページからzipページに繊維ができて、こんな画面が表示されてればOKです!
bookアクションを作成
ここから本題
それでは今回のメインである、書籍検索を行うアクションを作成していきたいと思います。
slices/book.jsを作成する
reduxj-toolkitを使用してbookのsliseを作成しましょう。
Google Books APIで返されるtotalItemsと書籍情報のitemsをstoreに保持するためにStateにtotalItems:”とitemList:[]を持ちます。
// Stateの初期状態
const initialState = {
  isFetching: false,
  totalItems: null,
  itemList: [],
};
actionにはreceiveGetBookを作成して、取得した結果でStateを更新させます。
const book = createSlice({
  name: 'book',
  initialState,
  reducers: {
    initBook: () => (initialState),
    receiveGetBook: (state, action) => ({
      totalItems: action.payload.totalItems,
      itemList: action.payload.itemList,
    }),
  },
});
次に実際に書籍検索を行うアクションを作成します。
これはaxiosを使って非同期通信を行うので、非同期処理になるのですが、Redux Toolkitでは非同期処理もサポートされていて、Sliceとは別にdispatch関数を引数にする関数を返却する関数を作成すると非同期処理を行う関数として定義されます。
/**
 * 書籍検索
 * @param searchWord
 * @returns {function(...[*]=)}
 */
export const getBook = (searchWord) => {
  const booksUrl = `https://www.googleapis.com/books/v1/volumes?q=${searchWord}`;
  return async (dispatch) => {
    const response = await axios({ method: 'get', url: booksUrl });
    dispatch(receiveGetBook({
      totalItems: response.data.totalItems,
      itemList: response.data.items === undefined ? [] : response.data.items,
    }));
  };
};
Redux Toolkitを使わない場合はredux-thunkなどをmiddlewareに設定してreduxで利用するんですが、Toolkitにはredux-thunkが内部で利用されていますので、slice内で使う分には個別にインストールする必要はありません。
しれっとaxiosをawaitで呼んでる箇所も出てきましたが、axiosの使い方は今回のようにconfigとして呼ぶ方法と、axios.get(…..)と呼ぶ方法など用途に合わせて好みで使いやすい書き方をすればいいと思います。
Redux Toolkitについては下記サイトなどでちゃんと復習をしておきましょう。
[blogcard url=”https://www.hypertextcandy.com/learn-react-redux-with-hooks-and-redux-starter-kit”]
axiosでは処理を挟ませるintercepterやカスタムヘッダー、エラーハンドリングのやり方などいろいろ覚えておくべき事があるので、ぜひちゃんと公式Docや参考サイトをみておいて下さい!
下記サイトはとてもわかりやす参考になると思います。
[blogcard url=”https://www.yoheim.net/blog.php?q=20170801″]
slices/book.jsの全体像
bookのsliceはこんな感じになります。
import { createSlice } from '@reduxjs/toolkit';
import axios from 'axios';

// Stateの初期状態
const initialState = {
  totalItems: null,
  itemList: [],
};
const book = createSlice({
  name: 'book',
  initialState,
  reducers: {
    initBook: () => (initialState),
    receiveGetBook: (state, action) => ({
      totalItems: action.payload.totalItems,
      itemList: action.payload.itemList,
    }),
  },
});

// 個別でも使えるようにActionCreatorsをエクスポートしておく
export const { initBook, receiveGetBook } = book.actions;

/**
 * 書籍検索
 * @param searchWord
 * @returns {function(...[*]=)}
 */
export const getBook = (searchWord) => {
  const booksUrl = `https://www.googleapis.com/books/v1/volumes?q=${searchWord}`;
  return async (dispatch) => {
    const response = await axios({ method: 'get', url: booksUrl });
    dispatch(receiveGetBook({
      totalItems: response.data.totalItems,
      itemList: response.data.items === undefined ? [] : response.data.items,
    }));
  };
};

export default book;
Google Books APIのURLは
https://www.googleapis.com/books/v1/volumes?q=${searchWord}で、q=に検索ワードを指定すると、そのワードにヒットした書籍情報を返してくれます。
slices/reducers.jsの更新
slices/book.jsを作成したので、storeに統合させるためにreducers.jsに追加します。
import { combineReducers } from 'redux';

import counter from './counter';
import book from './book';

const rootReducer = combineReducers({
  counter: counter.reducer,
  book: book.reducer,
});

export default rootReducer;
※追加箇所はハイライトしてあります。
bookアクションを実装
次は作成したbookアクションをBookContainerで読み込み、BookComponentにpropsとして流し込んだり、検索結果を表示する箇所をBookComponentに追加していきます。
BookContainerの修正
actionの追加方法やstoreへのアクセス方法はcounterと同様で、useSelectorやアクションクリエーターをmemo化するuseActions.jsを使って行います。
import React, { useEffect } from 'react';
import { useSelector } from 'react-redux';

import Book from '../../components/book/BookComponent';
import { getBook } from '../../slices/book';
import useActions from '../../slices/useActions';

const BookContainer = () => {
  const bookActions = useActions({ getBook });
  const book = useSelector((state) => state.book);

  useEffect(() => {
    console.log('BookContainer:useEffectによる初回処理');
  }, []);
  return (
    <div>
      <Book actions={bookActions} book={book} />
    </div>
  );
};

export default BookContainer;
ごめんなさい。
slices/useActions.jsが今までslices/userActions.jsになってたので、修正して下さい。
BookComponentの修正
BookComponent.jsxでは、Containerからprops経由で受け取ったstoreのデータを表示させたり、actionを実行したりさせます。
まずはpropsを追加してactionとbookを受け取りましょう。
import React, { useState } from 'react';
import PropTypes from 'prop-types';
...
{途中略}
...

const BookComponent = (props) => {
  const classes = useStyles();
  const history = useHistory();
  const { actions, book } = props;

  ...
  {途中略}
  ...
};

BookComponent.propTypes = {
  actions: PropTypes.shape({
    getBook: PropTypes.func,
  }).isRequired,
  book: PropTypes.shape({
    totalItems: PropTypes.number,
    itemList: PropTypes.array,
  }).isRequired,
};

export default BookComponent;
次に検索ボタンを押したときのClickイベントにアクションを追加します。
  const handleOnClickSearch = async () => {
    // 検索アクション実行
    await actions.getBook(searchWord);
  };
最後に、検索結果が表示される箇所を書き換えます。
propsから引き継いだbookにreducer経由で取得した検索結果が入っているので、book.totalItemsの検索結果数を表示し、book.itemListを展開してCard内に表示しています。
          <div>
            <h3>検索された書籍は?</h3>
            検索結果数:{book.totalItems}
            <div hidden={book.totalItems !== 0}>
              検索結果がありません。
            </div>
            <div>
              {book.itemList.map((item) => {
                const { volumeInfo, id } = item;
                return (
                  <Card key={id} style={{ margin: 5 }}>
                    <div>
                      <a href={volumeInfo.infoLink} target="_blank" rel="noopener noreferrer">
                        {volumeInfo.title} {volumeInfo.subtitle}
                      </a>
                    </div>
                    <div>
                      {volumeInfo.authors === undefined ? null : volumeInfo.authors.join(',')}
                    </div>
                    <div hidden={volumeInfo.imageLinks === undefined}>
                      <img
                        src={volumeInfo.imageLinks === undefined ? null : volumeInfo.imageLinks.smallThumbnail}
                        alt={volumeInfo.title}
                      />
                    </div>
                    <div style={{ textAlign: 'left', padding: 10 }}>
                      {volumeInfo.description}
                    </div>
                  </Card>
                );
              })}
            </div>
取得される検索結果には書籍によって存在しない項目(authorsとかimageLinksとか)もあるので、undefinedチェックして表示するようにしてます。
BookComponent.jsxの全体像
最終的にBookComponent.jsは以下のようになります。
import React, { useState } from 'react';
import PropTypes from 'prop-types';
import { useHistory } from 'react-router';
import { makeStyles } from '@material-ui/core/styles';
import TextField from '@material-ui/core/TextField';
import Button from '@material-ui/core/Button';
import Card from '@material-ui/core/Card';


const useStyles = makeStyles((theme) => ({
  button: {
    margin: theme.spacing(1),
  },
}));


const BookComponent = (props) => {
  const classes = useStyles();
  const history = useHistory();
  const { actions, book } = props;

  const [searchWord, setSearchWord] = useState('');


  const handleOnClickSearch = async () => {
    // 検索アクション実行
    await actions.getBook(searchWord);
  };

  return (
    <div style={{ width: '100%' }}>
      <div style={{ textAlign: 'center' }}>
        <h2>
          書籍情報を検索するやつ
        </h2>
        <div className="centerTable" style={{ width: '100%', maxWidth: 600 }}>
          <div>
            <h3>検索ワードを入力</h3>
            <TextField
              id="search-word"
              label="検索ワード"
              placeholder="検索したい文字・ワードを入れましょう"
              value={searchWord}
              onChange={(e) => setSearchWord(e.target.value)}
              helperText="ex)鬼滅の刃"
              margin="normal"
              fullWidth
              InputLabelProps={{ shrink: true }}
              required
              type="search"
              inputProps={{ title: '検索ワード', maxLength: 20, minLength: 0 }}
            />
            <Button
              className={classes.button}
              variant="contained"
              color="secondary"
              onClick={handleOnClickSearch}
              disabled={searchWord === ''}
            >
              書籍検索
            </Button>
          </div>
          <div>
            <h3>検索された書籍は?</h3>
            検索結果数:{book.totalItems}
            <div hidden={book.totalItems !== 0}>
              検索結果がありません。
            </div>
            <div>
              {book.itemList.map((item) => {
                const { volumeInfo, id } = item;
                return (
                  <Card key={id} style={{ margin: 5 }}>
                    <div>
                      <a href={volumeInfo.infoLink} target="_blank" rel="noopener noreferrer">
                        {volumeInfo.title} {volumeInfo.subtitle}
                      </a>
                    </div>
                    <div>
                      {volumeInfo.authors === undefined ? null : volumeInfo.authors.join(',')}
                    </div>
                    <div hidden={volumeInfo.imageLinks === undefined}>
                      <img
                        src={volumeInfo.imageLinks === undefined ? null : volumeInfo.imageLinks.smallThumbnail}
                        alt={volumeInfo.title}
                      />
                    </div>
                    <div style={{ textAlign: 'left', padding: 10 }}>
                      {volumeInfo.description}
                    </div>
                  </Card>
                );
              })}
            </div>
          </div>
        </div>
      </div>
      <div style={{ textAlign: 'center' }}>
        <Button
          className={classes.button}
          variant="text"
          onClick={() => history.push('/')}
        >
          トップに戻る
        </Button>
      </div>
    </div>
  );
};

BookComponent.propTypes = {
  actions: PropTypes.shape({
    getBook: PropTypes.func,
  }).isRequired,
  book: PropTypes.shape({
    totalItems: PropTypes.number,
    itemList: PropTypes.array,
  }).isRequired,
};

export default BookComponent;
とりあえず、これでaxiosを使ったREST通信の実装がざっくり完了しました。
実行してみる
ではnpm startで実行してみましょう。
検索ワードに好きな単語を入れて「書籍検索」をクリックしてみると、検索された書籍が10件分表示されたと思います。
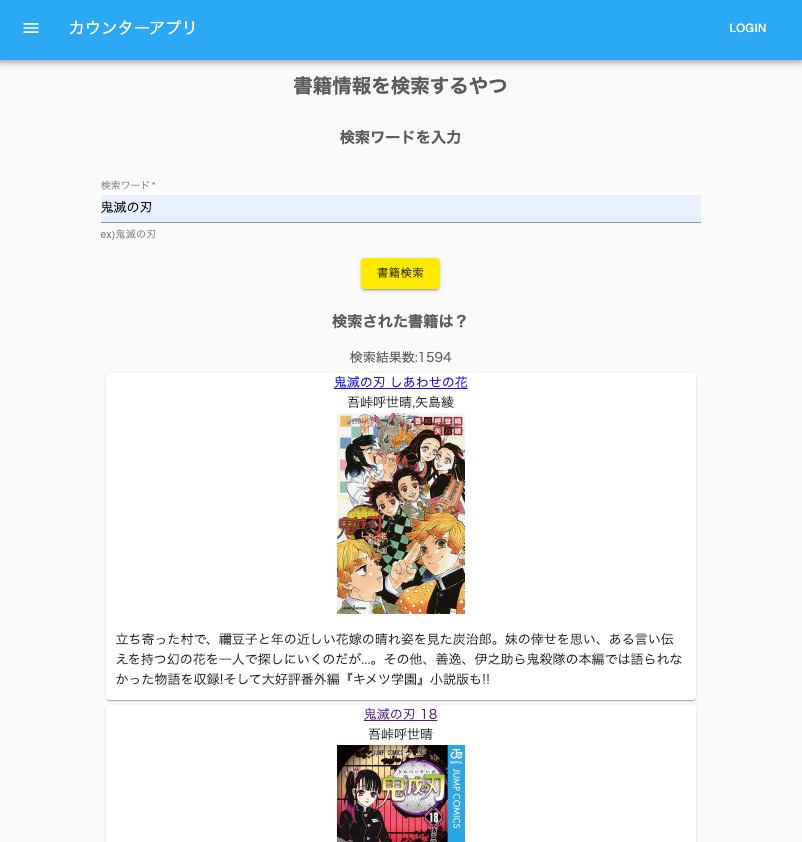
ページングや読み込み中の制御などは全く実装してませんが、ちょっとWebアプリっぽくなってきたんじゃないでしょうか?
おまけ(通信の確認)
axiosでアクセスしたAPIのレスポンスやリクエストの内容はブラウザのdevToolなんかで見るとわかりやすいです。
これはChromeのDevTool画面
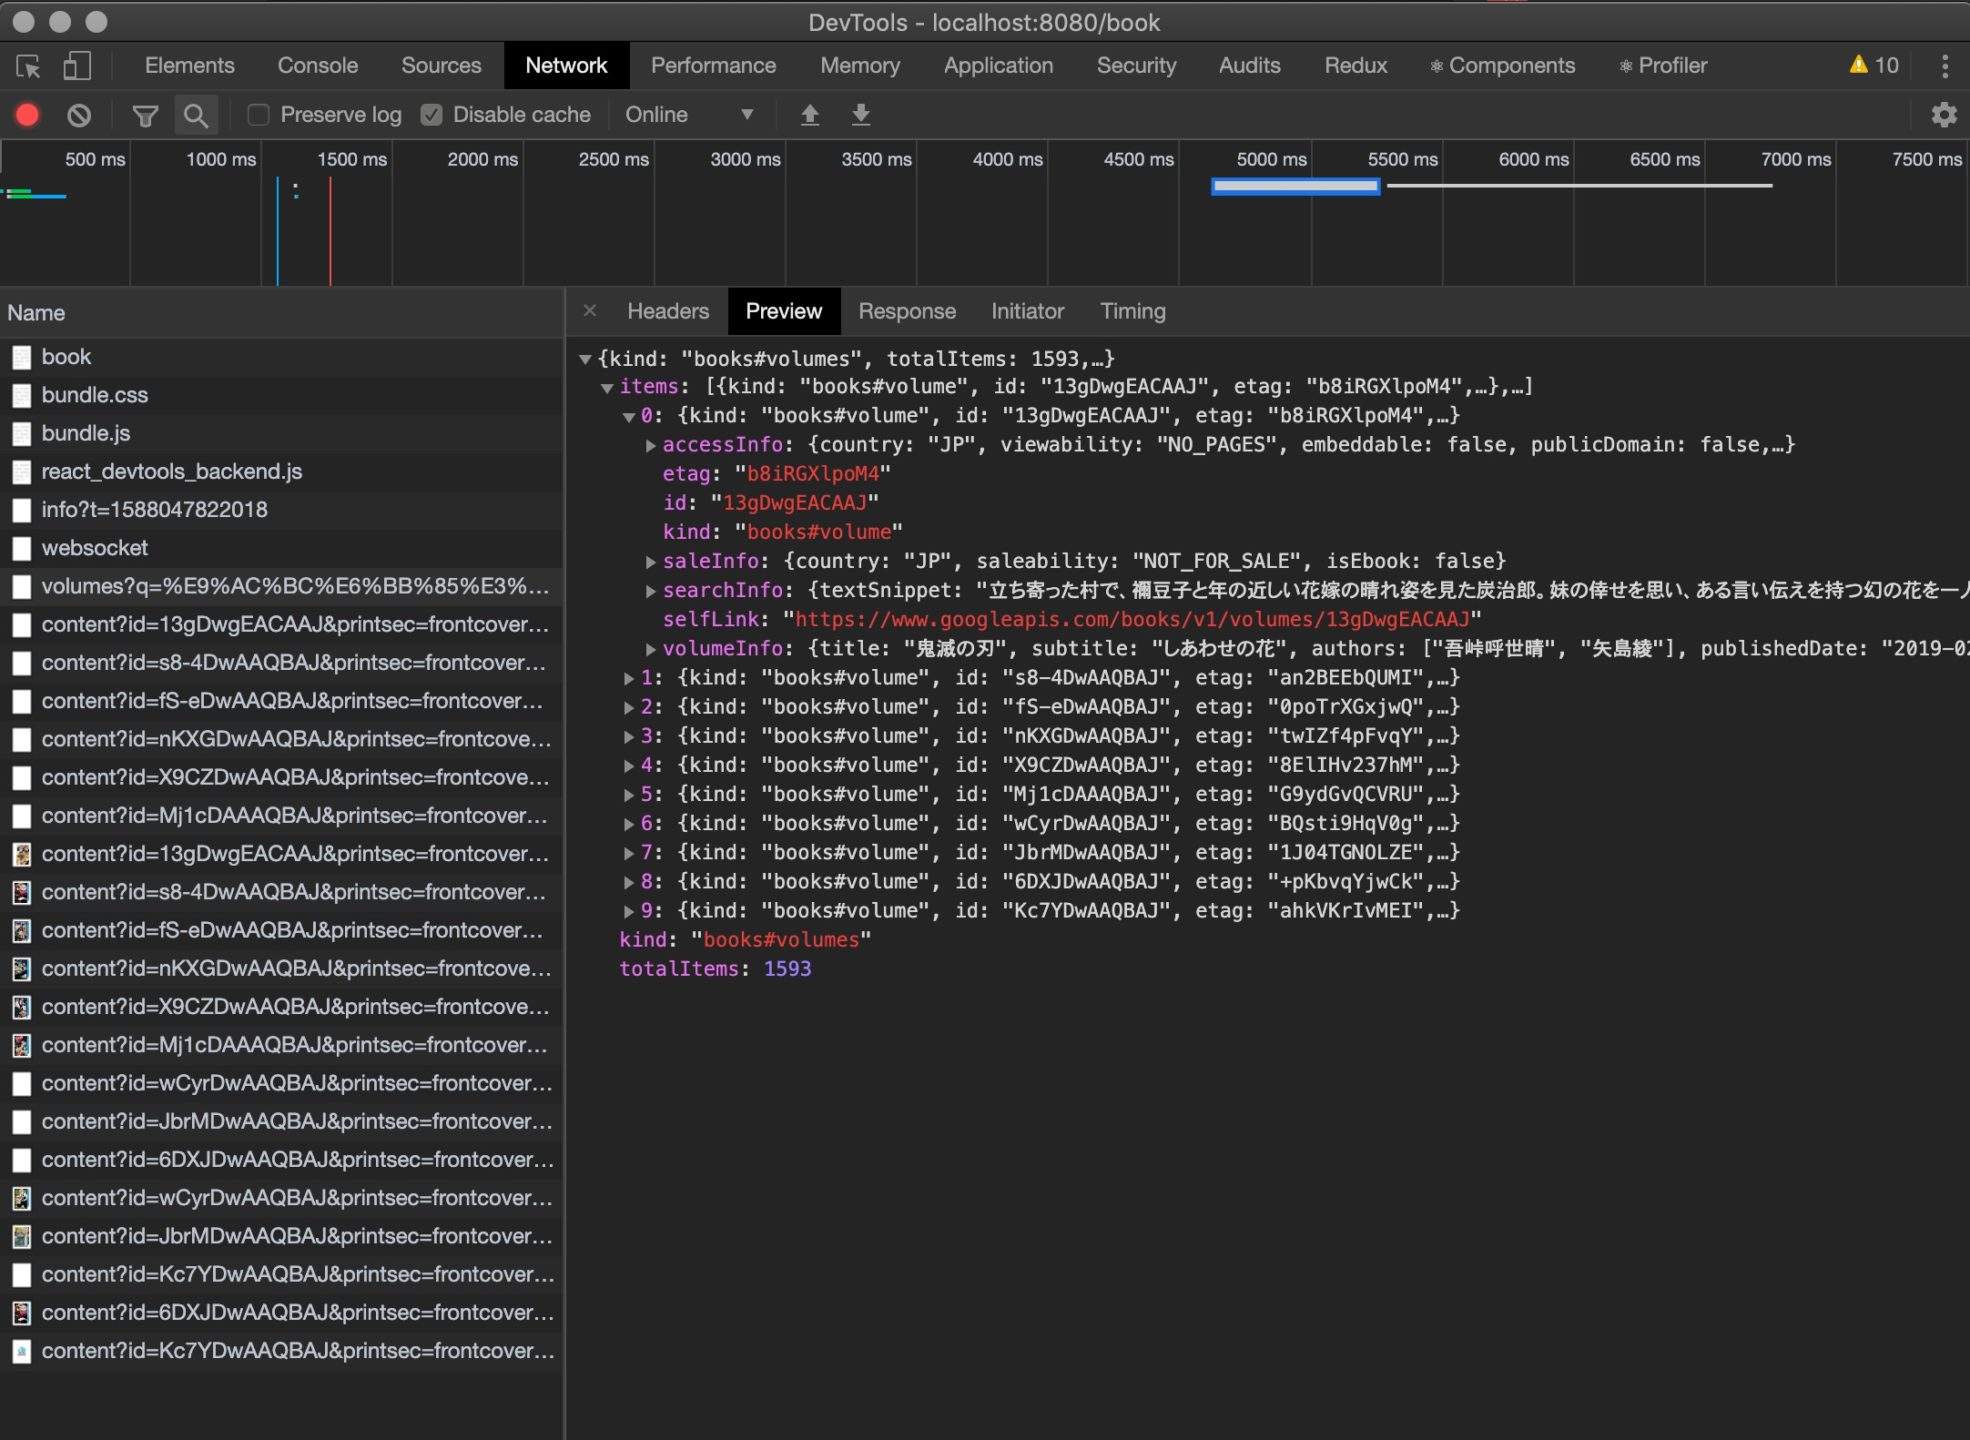
フロント開発時はよく使うので見方や表示される内容を覚えておきましょう。
axiosでREST API通信実装編まとめ
ざっと駆け足でaxiosを使ってGoogleBooksAPIから書籍情報を取得するところまで実装してみました。
かなり細かい説明は全部省いてしまって、まずは動かすところまでといったところです。
axiosの説明は一切触れてませんが、途中でも書きましたが色々と便利なことができる素晴らしいライブラリなので、ぜひちゃんと使い方を調べてみたり、もっと触ってみることをオススメします。
非同期処理をreduxに組み込むのもRedux Toolkitを使うことによってかなり簡単に意識せずに扱えるようになりました。
この辺りもredux-thunkの仕組みや機能などは一度調べてみたりしてみて下さい。
誰かの参考になれば嬉しいです。
- react-reduxでAPI通信を実装するにはaxiosが良き!
- ReduxToolkitならば非同期処理に対応なのでそこまで意識せずに実装可能
- axiosやreduxでの非同期処理についてはさらなる勉強をするべし
次回予告
次回予告というかやろうと思ってること
- Redux Toolkitから作成するDucksパターンで実装する[jin_icon_check_circle]完了
- ESLintでAirbnbのスタイルガイドを実装する[jin_icon_check_circle]完了
- Materialデザインを実装する[jin_icon_check_circle]完了
- カスタムCSSを実装する[jin_icon_check_circle]完了
- ページルーティングを実装する[jin_icon_check_circle]完了
- 開発環境の効率化をするためにHotReloadとソースマップを実装する[jin_icon_check_circle]完了
- REST通信を実装する[jin_icon_check_circle]完了
- 通信中の制御やページングを実装する
- ログイン制御のフローを実装する
- デプロイ方法を検討、実装する
次回は書籍検索をもう少し実用に耐えられるように細かい制御を実装していきたいと思います。
勉強するならプログラミングスクールがベスト
今からプログラミングを勉強してプロのエンジニアを目指すなら、プログラミングスクールで勉強するのがベストです!
最短4週間で未経験からプロを育てるオンラインスクールなので、自宅からプログラミングやアプリ開発を学ぶことができます。




コメント