
React × Reduxの連載記事の2回目です。
今回は前回の環境構築編で作成したreact-reduxのsampleカウンターアプリを、Redux Toolkitを使ってducksパターンに変更していきたいと思います。
環境周りは変わりませんので、まだ開発環境ができてない人は1回目の記事を見てsampleカウンターアプリが動く状態にしてから見てもらえるとありがたいです。
- ducksパターンの概要
- Redux Toolkitを使ったducksパターンの作成
この記事のターゲットとなる環境
現在の環境状況や前提条件を書いておきます。
- Mac OS Catalina ver 10.15.3
- 1日目の環境構築編まで理解している
- 環境ターゲット(2020-03-10現在最新)
- React16.13
- Redux7.2
1日目の記事はこちら
http://hirooooo-lab.com/development/react-redux-setup-environment/Ducksパターンとは
React-Reduxの構築パターンとしてよく知られるやつ(1日目時点の構成)はredux-wayと呼ばれるパターンです。
これは1日目の記事を見てもらればわかるんですが、以下のディレクトリ構成で構築されています。
- Components
- Containers
- Reducers
- Actions
- Types
この分け方だと役割によってきちんとファイルを分割して管理ができるのですが、ファイル数が多くなり見通しが悪くなってしまうデメリットがあります。
そこで考えられた構成パターンがDucksパターンです。
Ducksパターンではaction、reducer、typesを1つのmoduleというファイルにまとめて管理するというやり方です。
action、reducer、typesはそれぞれが密結合になっているので1つにしたほうがみやすいという考えで考案されました。
以前まではDucksパターンを構築するには、自分で理解したのち、1つのmoduleファイルにまとめて作成する必要があったのですが、Redux Toolkitの登場により、簡単いmoduleを作成することができるようになりました。
Redux Toolkitで構築してみる
早速ReduxToolkitを使ってmoduleを作成してみたいですが、まずはReduxToolkitをインストールしましょう。
Redux toolkitのインストール
以下のnpmコマンドを実行してインストールします。
$ npm install --save @reduxjs/toolkitcreateSliceでmoduleを作成する
Redux Toolkitのインストールができたら実際にmoduleを作成してみましょう。
Redux TookitではmoduleのことをSliceというオブジェクト名で扱います。
Redux ToolkitにはSliceを簡単に作成するcreateSlice関数が用意されています。
slices/counter.jsの作成
実際にactions/counter.jsxとreducers/counter.jsxとconstants/ActionTypes.jsxの内容を一つにまとめたslices/counter.jsを作成してみます。
slice/counter.js
import { createSlice } from '@reduxjs/toolkit';

// Stateの初期状態
const initialState = {
  value: 0
};

const counter = createSlice({
  name: "counter",
  initialState,
  reducers: {
    increment: state => ({ value: state.value + 1 }),
    decrement: state => ({ value: state.value - 1 }),
  }
});

// 個別でも使えるようにActionCreatorsをエクスポートしておく
export const { increment, decrement } = counter.actions;

export default counter;
多分みてもらえればわかると思うんですけど、createSliceでactionとreducerを同時に作成しています。
storeの作成
今まではreducerをcombineReducersでまとめたreducers/index.jsxをstores/configureStore.jsxでstoreを作成してました。
以前の3つのファイルを載せておきます。
import * as types from '../constants/ActionTypes';

const initialState = {
  value: 0,
};

const counter = (state = initialState, action) => {
  switch (action.type) {
    case types.INCREMENT:
      return { value: state.value + 1 };
    case types.DECREMENT:
      return { value: state.value - 1 };
    default:
      return state;
  }
};

export default counter;
import { combineReducers } from 'redux';

import counter from './counter';

const rootReducer = () => combineReducers({
  counter,
});

export default rootReducer;
import { createStore } from 'redux';
import rootReducer from '../reducers';

const configureStore = () => {
  const store = createStore(
    rootReducer(),
  );

  return store;
};

export default configureStore;
今回はreducerがsliceに書いてあるので、configerStoreの部分をstores/index.jsを作成して書きたいと思います。
stores/index.jsの作成
stores/index.jsを作成して、以下のコードを書きます。
import { combineReducers, configureStore } from '@reduxjs/toolkit';

import counter from '../slices/counter';

const rootReducer = combineReducers({
  counter: counter.reducer,
});

const store = configureStore({
  reducer: rootReducer,
});

export default store;
reducer/indexで行っていたreducerの合体とconfigureStoreでやってたstoreの作成をやっています。
Containerに流し込むactionの修正
actionをsliceに含めて書いているので、containerで流し込んでいるactionをsliceに変更します。
container/AppContiner.jsxを下記のように修正します。
import React, { useMemo } from 'react';
import { bindActionCreators } from 'redux';
import { useDispatch, useSelector } from 'react-redux';

import Header from '../components/header/HeaderComponent';
import Counter from '../components/counter/CounterComponent';
// import CounterActions from '../actions/counter';
import { increment, decrement } from '../slices/counter';

const useActions = (actions, deps) => {
  const dispatch = useDispatch();
  return useMemo(
    () => {
      if (Array.isArray(actions)) {
        return actions.map(a => bindActionCreators(a, dispatch))
      }
      return bindActionCreators(actions, dispatch)
    },
    deps ? [dispatch, ...deps] : [dispatch]
  )
};

const AppContainer = (props) => {
  // const counterActions = useActions(CounterActions);
  const counterActions = useActions({ increment, decrement });
  const counter = useSelector(state => state.counter);

  const _counterProps = { counter, counterActions, ...props };
  return (
    <div>
      <Header />
      <Counter {..._counterProps} />
    </div>
  );
};

export default AppContainer;
actions/counterで設定していたactionCreatorをsliceに書いたactionに変更してます。
上記ではsliceからactionを個別にexportしているので、それをimportしてuseActions関数に渡していますが、sliceの全てのactionを使う場合は、slice.actionsを渡してもいいと思います。
エントリポイントのsrc/index.jsxの修正
storeがstores/configureStore.jsxからstores/index.jsに変わったので、Providerに流しているsrc/index.jsxを修正します。
import React from 'react';
import ReactDOM from 'react-dom';
import { Provider } from "react-redux";

// import configureStore from '../stores/configureStore'; ← いらない
import stores from '../stores'; ← 新しく作ったstores/index.jsx
import App from '../container/AppContainer';

// const stores = configureStore(); ← いらない

const render = () => {
  ReactDOM.render(
    <Provider store={stores}>
      <div>
        <App />
      </div>
    </Provider>,
    document.getElementById('root'),
  );
};

render();
ハイライトされているところが変更箇所となります。
これで一通りのRedux Toolkitを使ったDucksパターン化が完了です。
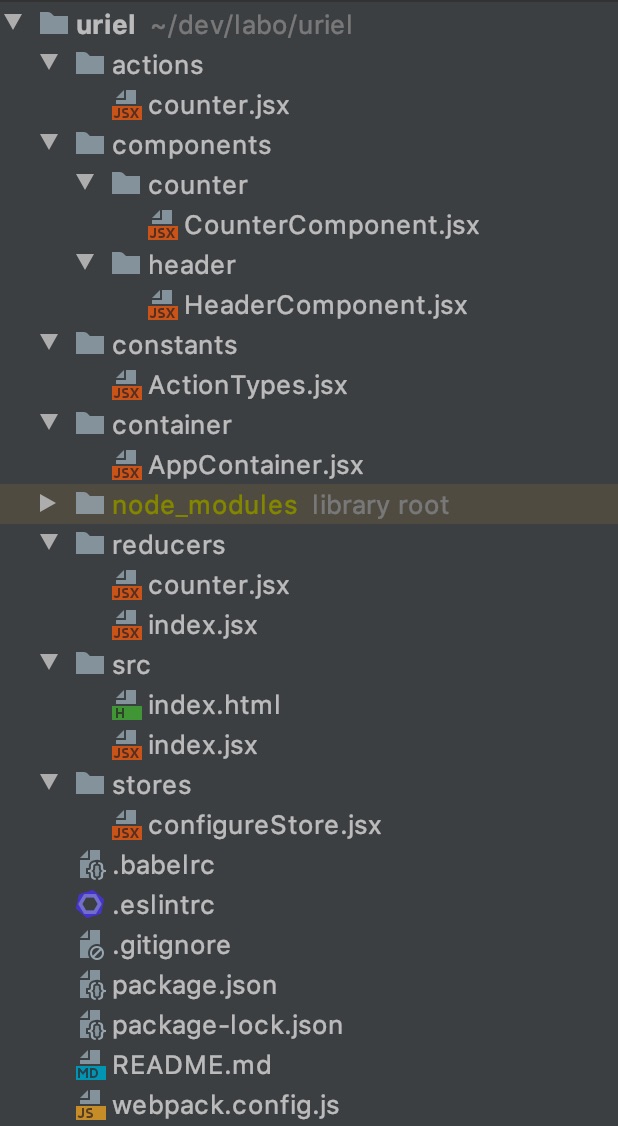
全体の構成
以前の構成(redux-wayパターン)と今回の構成(ducksパターン)を載せておきます。
redux-wayパターン
ducksパターン
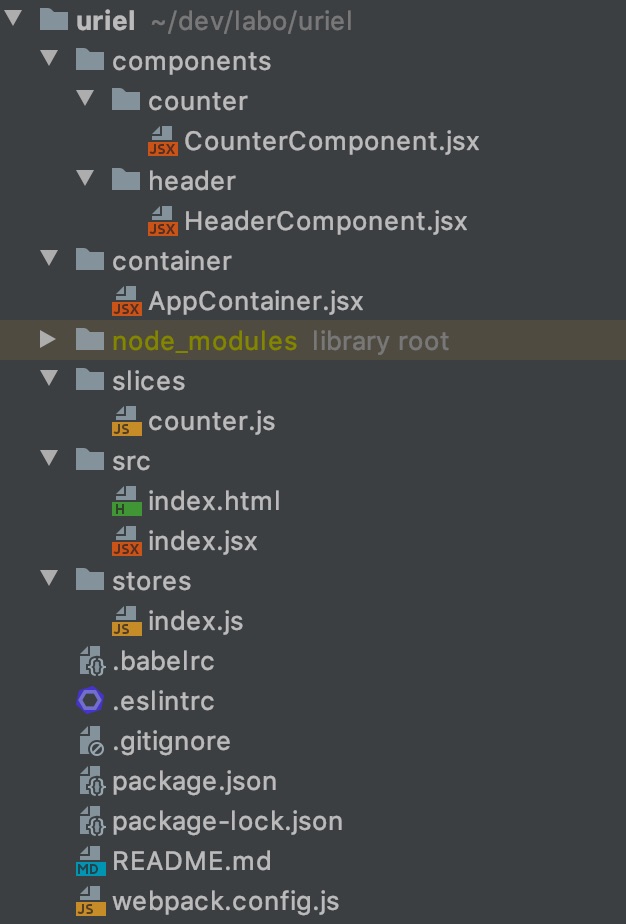
コードが少ないので実感はまだないかと思いますが、actionとreducerがなくなっただけでもだいぶスッキリしたと思います。
Redux Toolkitでducksパターン構築編まとめ
前回のカウンターアプリの状態をReduxToolkitを使ってducksパターンに変更してみました。
個人的にはducksパターンは見やすくてオススメです。
ただ、大規模になってくるとsliceが肥大化するというデメリットもあるようなので、その場合はRe-ducksパターンなどを検討してみるといいかもしれません。
Re-ducksパターンには触れませんので、気になる人は調べてみることをオススメします。
何にせよReact Reduxの構成はプロジェクトや使う人に合わせて自由に使いやすく構成するのが一番だと思います。
- action、reducer、typesを1つのmoduleにまとめたのがducksパターン
- Redux ToolkitではmoduleをSliceと呼ぶ
- Sliceを作成するcreateSlice関数が便利
次回予告
次回予告というかやろうと思ってること
- Redux Toolkitから作成するDucksパターンで実装する[jin_icon_check_circle]完了
- ESLintでAirbnbのスタイルガイドを実装する
- MaterialデザインとCSSを実装する
- ページルーティングを実装する
- 開発環境の効率化をするためにHotReloadとソースマップを実装する
- REST通信を実装する
- ログイン制御のフローを実装する
- デプロイ方法を検討、実装する
次の記事はこちら
http://hirooooo-lab.com/development/react-redux-eslint-by-airbnb/参考にしたサイト様
[blogcard url=”https://www.hypertextcandy.com/learn-react-redux-with-hooks-and-redux-starter-kit”]
[blogcard url=”https://qiita.com/Kazuki-Tohyama/items/ae35c49c7531f37beef8″]
[blogcard url=”https://webbibouroku.com/Blog/Article/redux-ducks”]
勉強するならプログラミングスクールがベスト
今からプログラミングを勉強してプロのエンジニアを目指すなら、プログラミングスクールで勉強するのがベストです!

最短4週間で未経験からプロを育てるオンラインスクールなので、自宅からプログラミングやアプリ開発を学ぶことができます。
[jin_icon_book size=”18px” color=”#2c05f0″]オススメ本


コメント